


Winter Outdoor Decor Ideas and Planter How-To
- Shelley Hodge

- Nov 26, 2020
- 4 min read
Updated: Nov 27, 2020
If you’re not ready for the Holiday’s yet, no doubt you’re getting in the spirit with all the Black Friday deals this week! Maybe this is the weekend you plan to start your outdoor decor to kick off December!
We’ve started sprucing (literally) up our Studio this week with outside planters and lanterns before we moved inside to decorate our mantle and Christmas tree. And we’ve got all the “how-to’s” for you to follow along and make your own exteriors warm and inviting this season!

One of my favourite things to create during winter (especially for Christmas) is an entryway planter filled with greenery and lights! Every year I search for the perfect planter (they’re not easy to come by during winter so when you find one in the summer when all the potting soil and plants are out, be sure to nab one then!) I finally found mine 2 summers ago at Canadian Tire and I have it filled year-round for all 4 seasons.
Living in Labrador means that a variety of greenery is sparse. I could have ordered fresh greenery like Cedar and Boxwood for this project (which I love) but to keep it simple, I went for a walk in the woods with Brad and Ralph, and we cut some good boughs off a blasty old black spruce tree. (Hence, "sprucing up." Points for those who know what "blasty" means!)

How to:
1. Start with your container with either rocks in the bottom and soil the rest of the way up, or a small planter inside of the larger one. (Oversized planters are tricky. It takes a lot of unnecessary soil to fill it all the way up so I fill mine 1/2 way up from the bottom with rocks and then the rest with soil.)
2. Add in your birch sticks to your planter. I usually fit mine towards the back so that it leaves a nice area to nestle ornaments or in this case, my light-up globe. If you don't have access to or not interested in cutting your own sticks, you can purchase them from our e-boutique by clicking here shelleyhodge.com/shop
Tip: when putting together any decor element like a flower or pot arrangement, embellishments look good in odd numbers;
3, 5 & 7.

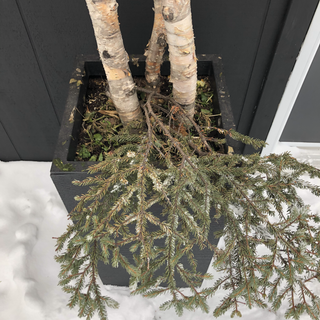
3. Fill in your planter with greenery.
I usually separate my piles of cut greenery into short pieces and long pieces. I use the long pieces first to start the bottom layer of the planter, filling in so that you cover the soil (or snow) and the lip of the planter entirely. Then I use my short pieces to fill in the gaps making it look full.

Tip: Branches have a natural downward curve. I tend to stick my large branches in my planters following this natural curve but I then insert the smaller branches in a mix of directions so that it looks less perfect and more textured.


4. Embellishments! The most fun part :)
There are a lot of different decor items you can use to add to your greenery. Traditionally I use planter picks (you can see the 3 red balls in the first picture which you can also get through our e-boutique) and outdoor string lights to fill my planters. But this year I wanted to try out a new gold/champagne monochromatic look with twinkle lights and gold sparkle against the black of the studio's exterior so I used the Twinkling Rattan Globes from the Canvas Collection at Canadian Tire. The little one was oversized enough to make a statement in the planter and I nestled the larger one on the ground so your eye travels around the planter instead of in just one spot.


5. Attaching the rattan balls.
In order to attach your embellishments, you will need to use either zip ties or florist wire. I used florist wire to attach my small ball onto the greenery by feeding it through the ball and then wrapping and securing the wire to one of the lower branches in the bunch.
I Used a longer piece of wire to wrap around the base of the planter and twisted the wire to a section of the large ball to secure it from blowing away!


6. Of course, good decor is all about balance so I couldn't leave the other side of the exterior empty! I repurposed some old lanterns with outdoor twinkle lights stuffed inside and cleverly hid the extension cord underneath the leftover boughs, for a clean look. Be sure to cover your cords and camouflage your wire or zip ties; you don't want to give away all your secrets!

7. Add a show-stopping wreath to your front door (in our case, the studio door) and light it up!

Christmas time is for bright lights and cozy nights! So get out there and get creative so you can enjoy your projects for the coming weeks! Who knows maybe you'll inspire someone along the way!
Follow us on our social media for weekly design inspo, creative living ideas and new things on the blog!
~Shelley


Comments